Web Rez 2
Resources for crafting your home page
- Finalize body text font choice, colors, background. All should coordinate with your name header (instructions for creating one are below).
- Decide on layout, including navigation scheme (placeholders / buttons on the page for upcoming pages, including "Home," "About me," "Resume" and "Links."
- Selection and addition of at least two images. All images must be optimized for the web and none should be more than 50-100K.
- Create a navigation bar
- Make dummy pages to link to
- Link nav bar to dummy pages
- Upload content to the web. Remember the basic process:
- Edit your page using Dreamweaver
- SAVE
- Upload all changed files using YourWeb)
- Check your work live on the Web using a browser (Firefox preferred)
- Your base URL should be http://username.yourweb.csuchico.edu/255
- Your base URL should be http://username.yourweb.csuchico.edu/255
NOTE: Dreamweaver is available in the Mac Lab (Tehama 312) and there are student assistants with web experience available to help during open lab hours (on JOUR 255 home page in Canvas).
- Choose a photo that is – or can be edited into – a hard horizontal image (think FB cover photo) and nicely represents the colors and image that you imagine for your website.
Note: The image must be at least 800 pixels wide to start with. If it's smaller you can't enlarge it, particularly if it's already optimized for the web. Most original photos from your smartphone or camera will be far larger than that.
- Save that photo into your images folder, giving it a kebab-case file name (e.g., header-italy.jpg).
- Open Pixlr Editor and choose "Open Image." Find photo in your desktop/255/images folder.
- Select the crop tool from your Pixlr toolbar at left.
cropping tool =
- Look at the crop info bar right above the image canvas and choose Constraint: Size," and W: 800; H: 250
info bar =
- You then can drag the corner of the crop box on your image until you have the parts of the image you want for your header.
- When you have the header box where you want it, hit Apply at far right on the crop info bar.
- You can now use the eyedropper tool to choose colors that coordinates with your photo. Just choose the eyedropper, then click on whatever color you want on the photo. This will change the foreground color at lower left on your toolbar.
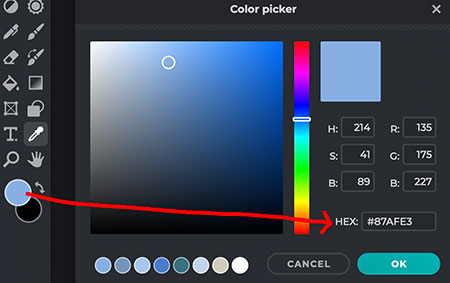
You can then double-click on the foreground color and find its color number (hexadecimal code, technically).
eyedropper =
hexadecimal color number = appears after the hashtag (follow red arrow). The code for the blue selected from my picture is #87AFE3.

Hint: Once you have selected a key color and have its hex code, go to
Paletton Color Scheme Designer and click on the hex code below the color wheel. Replace it with your color code and start checking out complementary color schemes.
- Go back to the photo, click on the text tool in the toolbar at left (T.) and click to add a text layer. Type your name and use the type nav bar above to choose your font, size and color attributes. If you want to save different versions as you are working, save them as header1, header2, header3, etc.
- When your header looks the way you want it, choose "File," "Save." The default saving style is "JPG (Good for most photos). Check the image file size at left, below the image. Should be less than 150K.
- Be sure you are saving into your 255 / images folder.
- You now can add the image to your index.html file and upload it to the web.
Navigation should be in the cell right under your header. Check
- Click in the second row of your four-row table
- Choose "Insert," "Table"
- Rows: 1
- Columns: 4 (You need a slot for each page you plan to link: Home, About me, Resume, Links)
- Width: 775 pixels (NOT percent!)
- Border thickness: 0 (or 1 if you want a border – your choice)
- Type the page name in each cell. Format the font as desired.
- You also can change the colors of the individual cells if that's what makes you happy.
- You also may insert small images inside each cell (above the text) to serve as buttons. Each of those images must be saved to your images folder inside your 255 folder.
- SAVE your index.html page and upload to the web using YourWeb
In order to create hyperlinks from your home page, you must have something to link to.
To do so, you must create placeholder files in Dreamweaver and save them to your 255 folder, one for each file you need to link to (about, resume, links).
- Choose "File," "New," "HTML"
- With that "Untitled Document" open, Choose "File," "Save As..."
- about.html
- With the page you just created open:
- Choose "File," "Save As..."
- resume.html
- Choose "File," "Save As..."
- links.html
- You now should have four files in the 255 folder on your desktop:
index.html
about.html
resume.html
links.htmlYou won't be editing these pages, so don't bother adding any content. You will overwrite them after you have hyperlinked them from your fully completed home page.
- Open your index.html file. In your navigation bar:
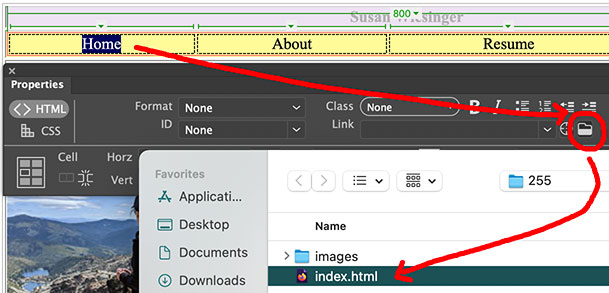
- Highlight the word Home
- Look at (or open) your Window –> Properties bar
- Click on the file folder to the right of "Link"
- Choose the index.html file in your 255 folder

- Highlight the words About Me
- Look at (or open) your Window –> Properties bar
- Click on the file folder to the right of "Link"
- Choose the dummy about.html file in your 255 folder
- Do the same with your Resume & Links nav links
- SAVE your index.html page.
- Upload your files and images to the Web and take a good look at your home page. Is everything the way you want it?
- Do you have the page header with your name at the top?
- Are the colors the way you want them?
- Do you like the nav bar?
- Be sure to make any changes BEFORE you create or add content to your inside pages.
What you are doing:
If you want to have a little picture in the page tab in your browser, you have to create the icon, save it into your 255 folder and add a bit of code into the code for each page.
----
Steps:
- Go to favicon.cc and create an icon (or use one on the site)
- Note that as you are creating your image, it's showing up in the tab above
- Choose "Download Favicon" and save to your 255 folder
- Open your index.html file in Dreamweaver
- Go to your page code; scroll to top
- Copy this code and paste above the line that says <title>:
<link rel="shortcut icon" href="favicon.ico" />
- Save page
- Upload pages and favicon.ico to web using File Manager in YourWeb
- If it doesn't show up in your browser, copy the URL and paste it into a different browser. Sometimes there's browser cache lag. Doesn't mean it's not there...
Something not working? Can't find something Dr. Wiesinger talked about in lecture?
Questions? Shoot Dr. Wiesinger an email (swiesinger@csuchico.edu) or go to office hours
If you're on a roll and want to keep going, start on Web 3.