Web Rez 1
Step-by-step instructions for working in Dreamweaver
You already should have created an index.html file with an 800 px table in it in Step 3 of the Web 1 assignment (in Canvas).
Now you'll be adding some color to the table, adding background color and adding an image of yourself.
Open Dreamweaver (I suggest you save a shortcut to your desktop or add to your dock – you'll be using the program quite a bit).
Open your index.html file.
File –> Open –> Desktop –> 255 –> index.html
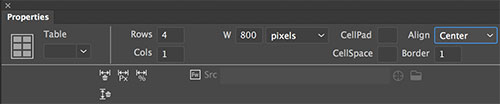
The table is the 800 px, four-row, one-column box you created to contain your content.
Before you get started, be sure you have your Properties toolbar open:
- Choose Window from the menu at the top of the screen
- Select Properties and a toolbar should pop up on your screen

To change the table color:
- Click anywhere in the table.
- Go to your Properties toolbar, click on bg to change the color

- To change the color of the entire table, right click anywhere in the table, choose "Table Select" and change the color
- You also can choose to center your table on the page.
- Right click anywhere in the table and choose "Table Select"
- Click on the little table on the left side of your Properties toolbar, click on align, choose Center
- In the top menu, choose "File," "Page Properties"
- Change the background color (bg)
- You also can add a background image here.
- Be sure you have saved the image in your images folder, inside your 255 folder on the desktop.
You should use no more than one typeface for your body text throughout your site.
Be sure it is one of the web-compliant fonts (Arial, Verdana, Georgia, Times, Courier).
Change typefaces by highlighting the line of text you want to change.
You also can make text bold, italics, etc. for emphasis.
- Select photo(s) you want to use.
You should use your own photos – those you own; those you have taken yourself.
You may use photos from free photo sites, like Pexels.Do not steal copyrighted photos from websites by using Google Images to find them or using content from sites like Canva. Look for images that are clearly marked as "Creative Commons."- You must provide a photo credit for every photo you use. You may not use an image if you don't know where it came from.
- Save copies of all photos for your web site in the images folder inside your 255 folder on your desktop.
- Be sure to give all photos simple names (e.g., beach-tree.jpg; your-name.jpg, etc.).
Why you are doing this:
Photos for the web do not need to be nearly as large as photos for printing.
Smaller photos require less bandwidth to upload and download (i.e., they load faster).
Photos for the web need to be sized and compressed so they are optimized for viewing on digital devices:
- small pixel-wise = no more than 800 pixels wide
- small file-size-wise = no more than 50 KB per photo
Any photo editing program can accomplish this, but instructions are included for Pixlr.
Tips before you begin:
- Don't start editing an original photo. Save a copy.
- Crop your photo to highlight what you want before you start sizing and compressing.
- A photo that starts out large (1000px x 1000px) can be made smaller.
- A photo that starts out smaller (200px x 200px) cannot be made larger without pixelating / blurring.
- Photos must be sized proportionally. A square photo (800px x 800px) does not magically become rectangular by changing the proportions (800px x 250 px). It distorts.
----
Steps:
- Save image into images folder
- Give it a simple kebab-case name (e.g., beach-tree.jpg, header.jpg, button.jpg or your-name.jpg)
- Open Pixlr Editor
- Open Image (Desktop -> 255 -> images)
- Crop photo if desired (tool at upper left in toolbar, double click when you have the picture the way you want it)

- Go to "Page," "Resize page (scale)"
- Width = Change width. Remember, your table is only 800 px wide, so NONE of your images should be wider than 800 px (be sure "Constrain Proportions" is checked below)
- Apply
- Save and compress photo (optimizing it for the web)
- Go to "File," "Save"
- Format = JPG
- Quality = Use slider and watch the file size change at left. Do not go below 80 on quality.
- File size (at left) should smaller than 50K, which can be as large as 150K
- Save as simple-file-name.jpg to your images folder in the 255 folder on your desktop.
- Open your page in Dreamweaver
- Click where you want the photo on the web page.
- Choose "Insert," "Image"
- Click on the folder at right below "Image Location" and go to your images folder inside your 255 folder on your desktop.
- Type in alternate text. Make it sentence case and descriptive (in other words, don't just put "myPhoto" it's intended to be read out loud)
- Save your web page.
- Upload page and images using File Manager in Your web.
- Page should be uploaded from the 255 folder on your computer to the 255 folder on the web.
- Photos should be copied from the images folder on your desktop to the images folder on the web.
- Go look at the page on the web. If your images don't show up, refresh the page. If they still don't show up, check and see where they are.
They must be in the same location on the web that they were in your desktop 255 folder (the images folder!).
1. Figure out where they are
- Open web page in Firefox
- Right-click on alt-text (the words that describe your picture)
- Choose "Open Image in New Tab"
- Click on page tab for image
- Correct image address should look like this: http://yourusername.yourweb.csuchico.edu/255/images/photo-name.jpg
- If there is any variation, image won't show up.
- If this is correct...
2. Open images folder online
- You can open your images folder by typing "/images" after your URL http://swiesinger.yourweb.csuchico.edu/images
- Is your photo in there?
- If not, you need to upload your image to the web using File Manager in YourWeb.
- If it is, click on it. Does it open? If so, the problem is likely a linking issue.
3. Fixing a linking issue
- Open index.html file in Dreamweaver, click on the image at right and see how it is linked at left. If it's not linked to your images folder, that's the problem (look at img src).
- Save, then re-upload your index.html file.
4. Go check your page on the web to see if image is now showing up