Web Rez 1
Getting ready to build your site
Why you are doing this: Adobe Dreamweaver is the industry standard for basic web design. Adobe Creative Cloud is free to Chico State students.
You should have received an email from Chico State ITSS saying that you have been granted a license for Adobe Creative Suite. (Dr. Wiesinger requested access for all JOUR 255 students. You do not need to ask Chico State for a license.)
- Follow this link for help installing Adobe Creative Cloud on your personal computer.
- Download / open Dreamweaver (you'll also be able to install Photoshop, Illustrator, Fonts, etc.).
Note: If you have an older / slower computer, email me. I can guide you to a free web authoring program (SeaMonkey) that is easy to use and takes up very little space on your computer.
- Open Dreamweaver
- File, New... Document Type: HTML (this is just to set up Dreamweaver – you won't be using or saving this page)
- Check to see that Split is selected at the top of the screen (it's blue if it's selected)
- To the right of Split, it should say Design. If it doesn't, use the dropdown arrow to the right to change
- Should see a blank page and a page with code, either one on top of the other or side by side
- Make it easier on your eyes (if what you see is two bright white pages glaring at you, there's help on the way)
- At top left, click on Dreamweaver
- Preferences...
- Scroll down to Interface
- Choose Dark
- Apply
- You should now see a split screen with the code side dark and the page design side white.
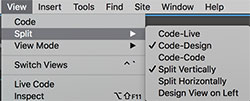
- Go to View in the top navigation bar
- Choose Split
- Check Code-Design and Split Vertically
- Open Properties toolbar (which will make working in Dreamweaver much easier)
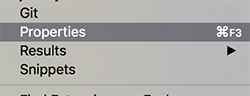
- At the top of the screen at left, in the main Dreamweaver toolbar, choose Window
- Look for Properties (about two-thirds of the way down the long list) and select it
- This opens a horizontal tool bar that you can move around your screen, as needed
- The Properties toolbar allows you to:
- Create hypertext
- Change colors
- Place images
- and more!
- Proceed to Step 3 and start your website...

What you're doing:
- Making folders (directories) to store your work.
- Creating your "index" page.
- Making a table to put content in.
- Putting your name in it as content.
Step-by-step:
- Make a directory/folder on your computer desktop in which to save your files.
- Call it 255. ALL of your files for this assignment MUST be saved in here.
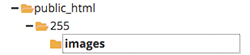
- Create a folder within that folder called "images" (this is where you will store photos and graphics for your Web site).
NOTE: All files and folders for your website MUST be INSIDE the 255 folder.
No exceptions.
- Create your home page in Dreamweaver
- File
- New
- New Document, Document Type: HTML
- Create
- Save the page
- File
- Save As...
- index.html (Remember, this is the web standard file name for a home page. It has to be index.html ONLY.)
- Save into the 255 folder you created on your desktop. (Must be inside the folder.)
- Change the page title (this is what shows up in the browser tab)
- On the code side, look for the words Untitled Document on line 5
- Change that to YourLastName Home

- Insert a table, which will provide the boundaries for your page content.
- Click on the right side of your screen – the non-code side, which is the design view:
- Choose "Insert," "Table."
- Rows: 4
- Columns: 1
- Width: 800 pixels (NOT percent!)
- Border: 1
- Put your name in the header (the top row). Center it and choose a web standards-friendly typeface (Arial, Verdana, Georgia, Times, Courier).
- Save and move to Step 4.
- Log in to yourweb.csuchico.edu
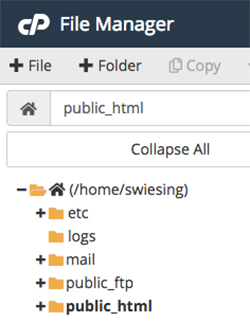
- Go to File Manager in Dashboard
- Open your public_html directory by clicking on the + sign in front of it (hint: if it's selected, the directory name is in boldface)
- To create the 255 folder for this project / website, click on the +Folder above, left (do this only once!)
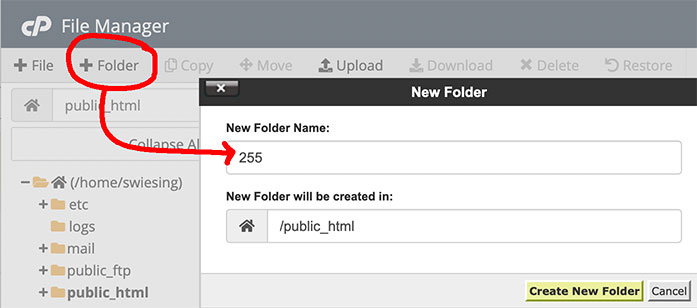
- To create the images folder inside the 255 folder, open the 255 folder, then click on the +Folder above, left (again, do this only once – once you have created the folders they are ready to host your files)
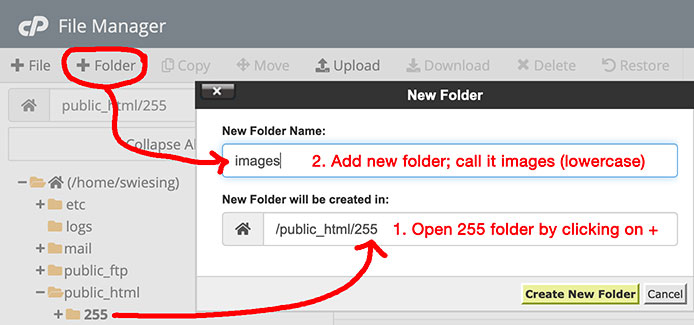
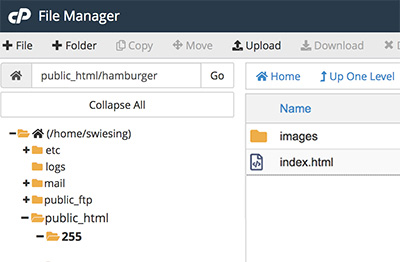
- Open the target folder by clicking on the + in front of it, which opens that folder
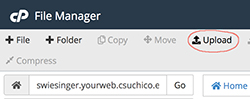
- Choose "Upload," which will open a second cPanel window
- Open Finder (Mac) or File Explorer (PC) on your computer and navigate to the 255 folder on your desktop
- Drag the file into the upload box in the cPanel window
Note: Be sure to drag files into the correct folder (255 to 255, images to images)

- To upload files into another folder (in this case, images), return to the first cPanel window and click on that folder
Then choose "Upload," which will open another cPanel window
- You can then drag files from your computer to that window (css on your computer to css online)
- When you're done uploading files, go check them live in a browser
Viewing your work on the Web
Home page URL will be: http://username.yourweb.csuchico.edu/255/index.html
Your web address is also linked on the class Web Rez Addresses page that is linked in the Resources tab at the top of the course website.
For example, this is a link to the page I started in class:
After you've created your home page file (index.html) in Dreamweaver, uploaded it to YourWeb and checked to see if you have content on the web, go to these step-by-step instructions for finishing Web 1. Here's the basic idea:
- Edit in Dreamweaver
- Save
- Upload using YourWeb File Manager
- Check live on the web
- Repeat